Distracted!
With working code to generate mollweide projections of my planetary surface and display it in a pyglet window, I got a little distracted. I ditched the window with its default width and height and generated images of a width and height with correct aspect ratio. Given there are 360 degrees of longitude and 180 degrees of latitude, the width needed to be twice the height. With this working, I randomly generated seeds for the noise and images of the corresponding projection for each seed. I kind of wanted to find a nice looking surface with many separate islands, and not just one or two planet wrapping islands.
A simple loop generates the images. I don't really need to use the Wichmann Hill generator that comes with Python, but I've been using it get to get small extractable seeds so that I can reseed the generator and get reproducible sequences. Irrelevantly, I am not illustrating this in the following code snippet.
    rg = random.WichmannHill()
    for i in range(2000):
        v = int(rg.random() * sys.maxint)
        terrain.set_noise_seed(v)
        generate_mollweide_image("mollweide/water-%011d.jpg" % v, 1000, 500)
Keep in mind that the projection attaches to the sides and not the top and bottom. So an island that features on the edge of the left or right hand side will wrap to the other side.
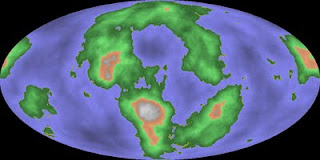
75893359 (like the majority of other seeds) produces a surface with one overly large island wrapping the lower half of the planet.

1320502026 produces a nicer planet with one larger island, several of medium size and a scattering of smaller ones.
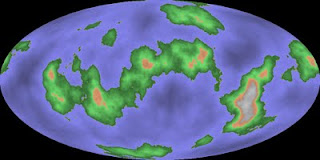
While 1898084921 produces one huge island, it is unique and interesting in having two huge inland bodies of water.
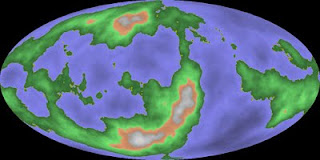
Lakes, mountains and a range of interesting islands of different sizes are present in 2029406243.
And there I am distracted into looking for interesting planetary surfaces again. At least it resulted in me optimising the code from taking 31 seconds to generate the height data of a given seed (640x480) to taking 1.8 seconds to generate the height data for a larger area (1000x500).
    def generate_mollweide_image(fileName, width, height):
        global heights, height_min, height_max

        print "generating heights"
        t = time.time()
        xscale = width
        yscale = int(height * 1.3)  # Cover more lines and leave no black ones.
        heights = terrain.mollweide_projection(8, xscale, yscale, width, height)
        height_min = min(heights, key=lambda x: sys.maxint if x is None else x)
        height_max = max(heights, key=lambda x: -sys.maxint if x is None else x)
        dt = time.time() - t
        print "generated heights", dt, "seconds", (height_min, height_max)

        print "generating colours"
        t = time.time()
        imageData = generate_image_data(width, height)
        dt = time.time() - t
        print "generated colours", dt, "seconds"

        print "saving image"
        mapImage = pyglet.image.create(width, height)
        mapImage.set_data('RGB', width * 3, imageData.tostring())
        mapImage.save(fileName)
All of the height generation now happens in a C extension (
terrain.mollweide_projection), which contributed to half of that optimisation.
Here's the original Python height generation routine:
def generate_mollweide_heights_xy():
    global heights, height_min, height_max

    heights = [ None ] * (w.height * w.width)

    xscale = w.width
    yscale = int(w.height * 1.3)  # Cover more lines and leave no black ones.

    longitude0 = 0.0

    for yi in xrange(yscale):
        v = float(yi) / yscale

        # Stay within the domain of -pi/2 to pi/2
        latitude = (v - 0.5) * math.pi

        dtheta = 0.149
        theta = latitude
        pi_sin_lat = math.pi * math.sin(latitude)
        i = 0
        while math.fabs(dtheta) > 5e-8:
            if i == 30:
                break
            dtheta = -(theta + math.sin(theta) - pi_sin_lat) / (1.0 + math.cos(theta))
            theta += dtheta
            i += 1
        theta = theta / 2.0

        for xi in xrange(xscale):
            u = float(xi) / xscale

            xj = (u - 0.5) * math.cos(theta)
            yj = math.sin(theta)

            xc = int((xj + 0.5) * w.width)
            yc = int(((yj + 1.0) / 2.0) * w.height)

            longitude = u * math.pi * 2.0 - longitude0
            x = math.cos(longitude) * math.cos(latitude)
            y = math.sin(longitude) * math.cos(latitude)
            z = math.sin(latitude)

            heights[yc * w.width + xc] = terrain.fBm(8, x, y, z)

    filtered_heights = [ x for x in heights if x is not None ]
    height_min = min(filtered_heights)
    height_max = max(filtered_heights)
It might be useful for someone who would also otherwise try and plug in the formulae present at
Wikipedia or
Mathworld.
I couldn't get the inverse transformation to produce anything that looked vaguely correct. And the forward transformation was much the same until I ditched a few elements and figured out the domain of the variables.
The corresponding C extension function:
static PyObject *terrain_mollweide(PyObject *self, PyObject *args) {
 PyObject *list, *ob;
 int octaveCount;
 float u, v, du, dv;
 float longitude, latitude;
 float dtheta, theta, sin_lat, cos_lat, cos_theta;
 float x, y, z;
 float xf, yf, xiterations, yiterations;
 int i, width, height, arr_size, arr_idx;
 float *arr;

 if (!PyArg_Parse(args, "(iffii)", &octaveCount, &xiterations, &yiterations, &width, &height))
  return NULL;

 arr_size = width * height;
 arr = malloc(arr_size * sizeof(float));
 if (arr == NULL) {
  PyErr_SetString(PyExc_RuntimeError, "failed to allocate working memory");
  return NULL;
 }

 for (i = 0; i < arr_size; i++)
  arr[i] = -1.0f;

 du = 1.0f / xiterations;
 dv = 1.0f / yiterations;

 v = 0.0f;
 while (v < 1.0f) {
  latitude = (v - 0.5f) * F_PI;

  theta = latitude;
  sin_lat = sinf(latitude);
  cos_lat = cosf(latitude);

  i = 0;
  dtheta = 0.149f;
  while (fabs(dtheta) > 4.9e-08f) {
   if (i == 30)
    break;
   dtheta = -(theta + sinf(theta) - F_PI * sin_lat) / (1.0f + cosf(theta));
   theta += dtheta;
   i += 1;
  }
  theta = theta / 2.0f;
  yf = ((sinf(theta) + 1.0f) / 2.0f);

  cos_theta = cosf(theta);
  u = 0.0f;
  while (u < 1.0f) {
   xf = (u - 0.5f) * cos_theta + 0.5f;

   longitude = u * F_PI * 2.0f;
   x = cosf(longitude) * cos_lat;
   y = sinf(longitude) * cos_lat;
   z = sin_lat;

   arr_idx = width * (int)(yf * height) + (int)(xf * width);
   if (arr_idx < 0 && arr_idx >= arr_size) {
    free(arr);
    PyErr_SetString(PyExc_RuntimeError, "internal out of range error");
    return NULL;
   }

   arr[arr_idx] = fBm(octaveCount, x, y, z);

   u += du;
  } /* while(u < 1.0f) */

  v += dv;
 } /* while(v < 1.0f) */

 list = PyList_New(width * height);
 if (list == NULL) {
  free(arr);
  return NULL;
 }

 for (i = 0; i < arr_size; i++) {
  if (arr[i] == -1.0f) {
   Py_INCREF(Py_None);
   ob = Py_None;
  } else {
   ob = PyFloat_FromDouble(arr[i]);
   if (ob == NULL) {
    Py_DECREF(list);
    free(arr);
    return NULL;
   }
  }
  PyList_SET_ITEM(list, i, ob);
 }

 free(arr);
 return list;
}
The image generation and colouring is now the slowest part of the process. Even worse is that the array and string shenanigans that pyglet insists on encounters
MemoryError exceptions with larger sized projections. But really, neither of these things matter as the map projection is serving its purpose.